Sunday, January 30, 2011

A Guide to Translating Yarn Labels

A couple of weeks back, one of the main topics in class was reading a yarn label.  Here is a rundown of  the discussion.

It doesn’t matter how your yarn is packaged, it could be in a neat little ball, a pull-skein, or in a hank. It will come with a label that gives you valuable information about the yarn.

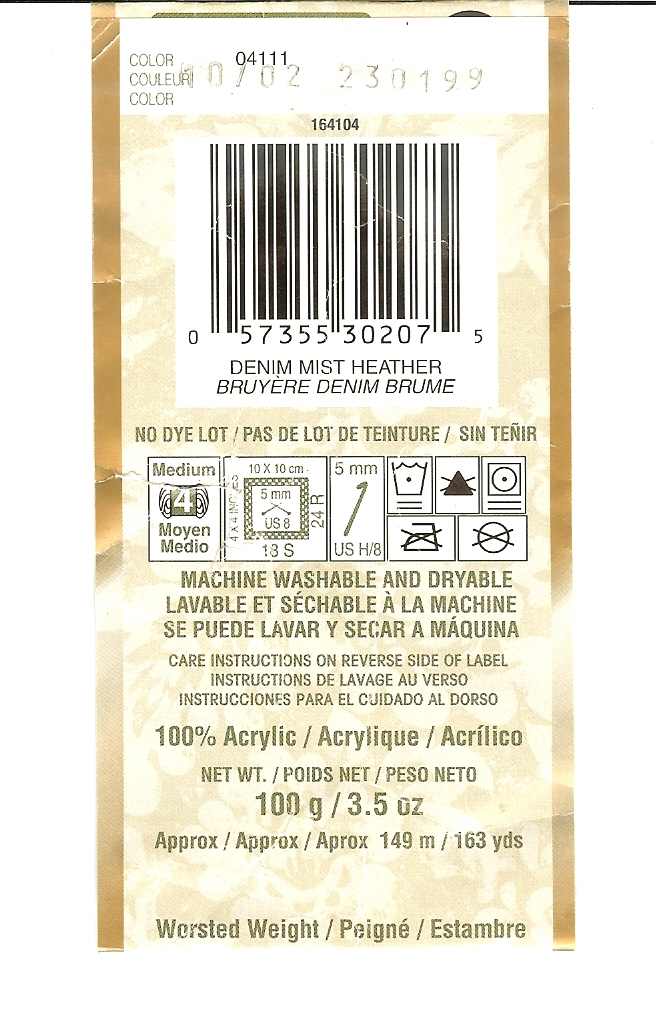
Yarn labels will include most, if not all, of the following information:


Article number: This is a code that the manufacturer uses to keep track of different products, but it isn't always listed a yarn label.


Brand name: This is the name of the yarn. In the case of this example, "Satin."


Care instructions: Most labels will use the international care symbols.  For this label:
               
 Machine Wash, Cold

 Do Not Bleach

 Tumble Dry, Normal, Low Heat


Do Not Iron


Do Not Dryclean


Color name and number: A particular yarn color is given a name or a number (or sometimes both). Here we have color #04111, “Denim Mist Heather.”


Company name and logo: The manufacturer's name and logo will be prominently displayed on the label. This is not the name of the Yarn! The manufacturer of this yarn is Bernat.


Dye lot number: The lot number indicates that all the yarns that have the same number were dyed in the same the batch. Make sure sure to purchase yarn from the same dye lot so it will all be the same shade.  Some yarns do not have a lot number, ususually 100% acrylic, as in the case of our example here.


Gauge: The suggested gauge, or number of stitches that fit in 4 inches, is also given on the label. In our example the knitting gauge is 18 stitches = 4 inches, and 24 rows = 4 inches. Usually there will be a recommended hook size for crochet, but not typically a crochet gauge, which is very different from knitting.  In our example the recommended hook size is USH/8.


Manufacturer's address: Sometimes the yarn manufacturer's address is provided, which can be helpful if you want more of their yarn and are having a hard time finding it.  Also, it is becoming common to list the manufacturer's web site where you will commonly find more information about the yarn, other yarns offered by the manufacturer and even free patterns using their yarns. 


Ply: Some yarn labels will provide ply information, such as 2 ply, 4 ply, or 12 ply, which means the number of strands that are twisted together to create the yarn. This does not refer to the thickness of the yarn, you can have a thin yarn with many plies.


Weight: The physical weight of the ball or skein of yarn will be listed. This may be in grams or ounces or both.


Yardage: The length of the yarn will be given in yards and/or meters. Don't buy by weight only. Different types of yarn, even at the same thickness, contain different yards per gram or ounce. 


Fiber content: Our example is “100% acrylic”, but you may see  "100% merino wool" or blends such as "85% wook, 20% acrylic."


Yarn-weight symbol: Many yarn companies are beginning to include this symbol, as are some patterns. In our label it is:

The yarn weight symbol is designed to standardize the yarn industry and is helpful when substituting yarns.  Keep in mind, though, that yarn weight is not the only factor you should consider when substituting yarns


Sunday, January 23, 2011

A yarn is a yarn, but which yarn?

Choosing which yarn to use for a knitting project is one of the main concerns I hear in my knitting classes.  Honestly, you can knit with any fiber that is a continuous length and flexible enough to wrap around the needles.  But, of course you're not going to knit a garment with just anything!  In order for your project to be a successful one, you should enjoy the process and like the material you are working with.  

Eventually you will begin to see how the yarn, shape of the garment you're making and stitch pattern you are using will work together to produce a successful project.  At the beginning of your knitting life, though, when you are making basic two dimensional shapes like scarves or blankets, its OK to let the yarn you fall in love with be the primary focus of your project. However, if a sweater is what will be on your needles then there is a bit more you will want to consider when choosing the yarn for it. Much of the time you might be working from a pattern and that will make your yarn selection simpler since you will likely use the yarn called for in the pattern.


If you find a yarn you really love, and want to make it into a sweater, then you will need to depend on the recommended gauge of the yarn to guide you in deciding the type of sweater that yarn will become.  Recommended gauge, also called 'tension', is listed on the yarn label along with recommendations for knitting needle size, and crochet hook size. It's given as a number of stitches and rows over 4 square inches or 10 square centimeters. This is important information to have, particularly when you are deciding if the yarn you are considering will work as a substitute for something else called for in a pattern you like.

However, if the yarn you are considering knits up to a gauge that might work for your intended project that doesn't mean it will be a good choice.  The same goes for two yarns have the same gauge, it doesn't necessarily mean that they can substitute for each other successfully. If they have different characteristics, texture, drape, fiber, and color, the final garment will look and feel different from what you expected, and might not suit the garment, or the intended recipient of your knitting efforts.  Imagine a summer cardigan made out of super bulky yarn.  How about a scarf that is made out of a material not suitable to wear next to your skin.  Or a cashmere sweater for your 8 year old nephew who will likely spill barbecue sauce on it as soon as he puts it on. Not pretty, or practical, is it?

Buyer beware: it isn't easy to predict what yarn in a ball will look like when it's knitted up. This is especially true of novelty yarns. Vibrantly colored hanks may look beautiful when on display, but be just the opposite of what you expected when knitted up. Plain traditional yarns will often surprise you by knitting up into a fabric you love and never expected.

Keep in mind, the drape and feel of your knitted fabric will vary greatly depending on the particulars of the yarn you choose; how tightly spun it is, the fiber its made of, and the dye used to color it.  Ideally you should check to see whether the yarns you're interested in have been knitted into a sample swatch. Most yarn shops knit up sample swatches or entire sweaters in the yarns they carry so that you can see what they look like worked up.  If this isn't the case for the yarn you want, buy one skein and knit it up into one huge swatch, or several smaller ones.  Really play with it, incorporating different stitch patterns and different knitting needles to see what the yarn's potential is.

If you want to work cables and stitch patterns, a smooth plied yarn in a solid color gives your stitches a sharp look, and will show your effort the best.  Novelty yarns will not usually showcase complex stitch patterns, but instead hide them.  In general, smooth plied yarns in a solid color are best for patterns where you want the knitting to stand out. Novelty yarns are best when you want the yarn to stand out, and in this case look best in plain stockinette or garter stitch.  This is true for variegated yarns too, very simple stitch patterns are best, lots of texture with tricky stitch techniques do not show up well, so why put in all the effort if no one is going to see it?
Also, keep in mind, novelty yarns can be tricky to work with.  The wilder the yarn, the more challenging (and depending on the yarn, maybe impossible) it will be to rip out stitches, or fix mistakes.

To sum up, when choosing the yarn for your knitting project, ask yourself (or the nice lady at the yarn shop):

·         Does it pill?
·         How is it laundered?
·         Is it colorfast?
·         Will it stretch?
·         Is it easy to knit with?
·         Does it work with the pattern I've chosen?
·         What size needle will it work best with?
·     If there is no one to ask, buy one ball, skein or hank and swatch!

Whatever yarn you choose, you're going to be seeing a lot of it, so make sure you like it and that it works for your intended project so it will be worth your knitting effort.

Sunday, January 16, 2011

Knitting Needles – What enquiring minds want to know

One of the most common questions I answer for new knitters in my los Angeles area knitting classes is what type of needles should I buy.  My answer is, whatever type you prefer.  To which of course, I get an exasperated look.  What Kind of an answer is that?!

So let me elaborate.  A little.

But, before I do, let me just say something you already know, all people are different.  Knitter’s are people and they too are different.  Even when you have two new knitter’s using the same yarn and needles, they each produce totally different results.

Which is one of the primary reasons the type of needles you should use depends on personal preference. 

Other factors involved in choosing needles are, and there could be more, material they are made of, if they are straight, circular, double pointed or jumper needles, length of the needles, the yarn you will knit with them, and the object you are making.

With all these variables, then, how do choose the best ones?  Well, my dears, try them all!  Of course, knowing a little about each type and what they are for will help you choose, but, still try them all.

Ok, let me continue … onward, to the needles:

The first consideration is the material the needles are made from.  Knitting needles can be made from, and are, just about any material – even glass!  The most common materials used for making knitting needles are metal (aluminum, stainless steel, brass), wood (birch, mahogany, bamboo, even composite), and plastic.  Then there are less common materials like glass and bone.

All types of knitting needles, straight, circular, double points etc.. can be made from any of these materials.  Here your choice will be affected by your preference (surprised?) and the yarn you will be knitting with. 
Metal knitting needles generally don’t have too much flex.  They are quite rigid.  They generally have a smooth slippery finish which works well with yarns that are not too slippery like wool.

Wood knitting needles have some degree of flex, with the exception of the hard woods like birch.  They often have a smooth finish, but not always.  Sometimes they have a slightly rougher finish that works well with slippery yarns like silk. 

Plastic needles have a lot of flex.  They are lighter than metal and wood knitting needles, except for maybe bamboo which is very light too.  The finish on plastic needles can vary from very smooth to slightly less so.  If you knit acrylic yarn with plastic knitting needles, you may create static electricity. 

Next, you’ll consider the type of knitting needles:

You’ll develop a preference for a specific type too. 

Before I get into describing the different types of needles, I want to point out that they all come in different sizes (the diameter of the needle) and lengths.  The size and length you choose will be determined by the yarn you will be using.  Ok, and your preference.

Generally, thinner yarns = thinner knitting needles, fatter yarns = fatter knitting needles.  But not always, it really depends on the fabric you want to make.  Denser fabrics are made by using much thinner needles in relation to the thickness of the yarn.  Less dense fabrics are made by using fatter needles in relation to the thickness of the yarn.  A fabric that is not too dense or too loose is achieved by matching the thickness of the yarn and needle. 

Choosing the length of needles is determined by the project and, yes, your preference.  It would be difficult to knit something that is 20” wide has a lot of stitches on 10” inch long straight needles.

Straight knitting needles, also called single point knitting needles, come in a variety of lengths, the most common being 10” and 13”.   These needles are used primarily for back and forth knitting, or knitting flat pieces.  In the case of sweater, the back, front(s) and sleeves are all made separately and then sewn together.
Circular knitting needles are incredibly versatile.  They are my preference.  Anything you can knit with any other type of needles can be knit with circular knitting needles – even things you would knit with double pointed knitting needles, like socks.

Jumper  knitting needles are straight needles with flexible ends.   Sort of like circular needles that had the cable cut at the mid point.  These are useful for knitting items that have a lot of stitches, like an afghan, for example.  They allow the bulk of the fabric to rest in your lap while you are knitting.  They are good for those that want to knit large flat pieces, but hate circular needles.

Double pointed needles are used to knit tubes, think hats, sweaters, socks.   They are much easier to work with than it seems at first sight.

If you knit a lot, and make a variety of things, you will eventually end up with a lot of, and a variety of knitting needles. 

Sunday, January 9, 2011

Shaping Your Hand Knit Sweater

Shaping simply means to go from small to big, or big to small.  Its a lot simpler than it seams.  Those of you who have taken my classes already know, numbers are not my friends.  But, in the interest of knitting harmony, we maintain a cordial relationship, numbers and me.  So if I can figure it out, anybody can.


Basically, all we want to know, regardless if you are going big or going small, is how far apart should the increases (going big) or decreases (going small) be and how many times should you repeat?  


Simple question right?  Well here is the simple answer, in 7 easy steps:


Lets pretend we want to shape a sweater sleeve from the top (shoulder) to the wrist...  we'll be decreasing since we are going from big to small.


(Oh, you'll need to make sure you have your gauge swatch handy, you did make one, right?)


Step 1.  Measure the width of the top of the sleeve and measure the width of the wrist.  Make sure you allow extra inches for ease.  (of course, if you're knitting in the round, measure the circumference for the top of the sleeve and wrist)

Step 2.  Subtract the smaller of the two measurements from the larger measurement.

Step 3.  Multiply the result by your stitch gauge.  This tells you how many stitches need to be decreased.

Step 4.  Divide this number by 2.  (in most cases, for sleeves you decrease 2 stitches every decrease round, or row, usually 1 decrease to either side of the seam line, but if you wanted to get rid of more stitches per round or row, divide by that number.)

Step 5.  Measure the vertical distance from the top of the sleeve to the wrist.

Step 6.  Multiply this measurement by your row gauge.  This will tell you how many rounds, or rows, there are between the top of the sleeve and the wrist.

Step 7.  Divide the answer for step 4 into the answer for step 6.  This will tell you how many rounds, or rows apart the decreases should be spaced.

That, my pretties, is all there is to calculating shaping.  

Tuesday, January 4, 2011

Adventures of Your Friendly Neighborhood Knitting Teacher

So you say you want to learn to knit.  You've gone to YouTube and armed yourself with a how-to book, needles and yarn.  All set, right?  Sure.

Obstacle No. 1:  The person in the YouTube video won't answer your questions, no matter how nicely (or loud) you ask.  They won't change the angle of the camera either.

Obstacle No. 2:  Your how-to book is written in some weird code from some fiber planet as yet to be identified.  No key to decipher said code is provided.

Obstacle No. 3:  Your hands, eyes and mind refuse to coordinate with your chosen needles and yarn.

My friends, before you throw your hands up in defeat, cursing the knitting universe, I invite you to join a knitting class.  With me as your intrepid teacher, of course.

While we're waiting for my next round of classes to start, because I know your fingers are itching to get started now, let me suggest a couple of books to get you going:

and are two of my favorites for beginners.

Oh, when and where do you register for class?
I'm glad you ask!  Follow the links to join in the fun ... 

City of Orange, CA


Whittier, CA